

Home
•
Sew in Style
•
DIY Book Pocket Pillow | Easy Envelope Pillow Cover + Appliqué Letter Tutorial

DIY Book Pocket Pillow | Easy Envelope Pillow Cover + Appliqué Letter Tutorial
Sew an Easy Envelope Pillow Cover + Learn Fabric Letter Appliqué
A cozy pillow, a favorite book, and a handmade place to keep them together, Project 6 might be one of our coziest Back-to-School projects yet!
This DIY Storytime Book Pocket Pillow combines a simple envelope pillow cover with a roomy front pocket that’s perfect for holding a favorite bedtime story, chapter book, coloring book, or even a small notebook.
And the best part? There are so many ways to make it your own.
For our pillow, we added the word DREAM to the front pocket using fabric appliqué letters. It adds a completely custom look, and you don’t need an embroidery machine to do it!

With a little fabric, fusible web, and a standard zigzag stitch, you can add names, initials, words, and sayings to all kinds of sewing projects.
We’re making our pillow on the NECCHI NC-59QD computerized sewing machine, and we’ll put its adjustable zigzag stitch, needle positioning, speed control, and other everyday sewing features to work as we go.

FREE Printable Appliqué Alphabet
We’ve created a complete printable appliqué alphabet you can use to customize your Storytime Pillow, or save for future projects!
Use the letters to add:
- Names to quilts or blankets
- Words and sayings to sweatshirts
- Initials to bags and pouches
- Personalized details to pillows
- Fabric lettering to home décor
- Custom touches to future sewing projects
And you can do it all with your sewing machine, no embroidery machine required.
Why Are the Letters Backwards?
Don’t worry, we did that on purpose!
The letters in your printable alphabet are mirrored because they’re designed for the fusible-web appliqué method.
You’ll trace the backwards letter onto the paper side of your fusible web. Once it’s fused to the wrong side of your fabric, cut out, and flipped over, your finished fabric letter will face the correct direction.

How to Make Fabric Appliqué Letters with a Sewing Machine
Before we construct our pillow, let’s personalize the book pocket.
We chose DREAM because it felt perfect for a cozy pillow made for bedtime stories, but this is where you get to make the project completely your own.
Spell a name, add a favorite word, use initials, or create your own short phrase.
What You’ll Need for Your Appliqué
- Printed NECCHI Appliqué Alphabet Template
- Fabric scraps for your letters
- Paper-backed fusible web or peel-and-stick appliqué adhesive
- Pencil or tracing tool
- Fabric scissors
- Iron and ironing surface
- Sewing machine
- Coordinating or contrasting thread
Scrap Saver Tip: Appliqué letters are perfect for using those little pieces of fabric that are too cute to throw away. We’re even using charm-square-sized scraps for ours!

Step 1: Choose & Trace Your Letters
Choose the letters you need to create your word or phrase.
Place your paper-backed fusible web paper side up and trace each mirrored letter onto the paper.
Remember: they’re supposed to look backwards right now!

Step 2: Rough Cut Your Letters
Cut around each traced letter, leaving a small amount of fusible web around the outside of your traced line.
Don’t carefully cut along the actual letter outline yet—we’ll do that after it’s attached to the fabric.

Step 3: Fuse the Web to Your Fabric
Place the adhesive side of the fusible web against the wrong side of your appliqué fabric.
Following the manufacturer’s instructions for your specific fusible product, press to adhere the layers together.
Allow everything to cool before moving on.

Step 4: Cut Out Your Fabric Letters
Now carefully cut each letter directly along your traced lines.
Remove the paper backing and flip your letter over.
There’s the magic—the letter is now facing the correct direction!
Continue until you’ve prepared all of the letters for your word.

Step 5: Arrange Your Appliqué
Before permanently attaching anything, arrange your letters on the right side of one Book Pocket fabric piece.
Play around with the spacing until you’re happy with the placement.
For multiple letters, it can be helpful to find the center of your pocket and work outward. This makes it easier to keep an entire word visually centered rather than trying to guess where the first letter should begin.
Once you’re happy with your layout, fuse or adhere the letters according to your fusible web instructions.
Now they’re ready to stitch!

Step 6: Stitch Around Your Appliqué Letters
You don’t need an embroidery machine to create beautiful fabric lettering.
We’re using a zigzag stitch on the NECCHI NC-59QD to permanently secure the raw edges of our appliqué.
For our sample, we set the zigzag to approximately:
Stitch Width: 4.0 mm
Stitch Length: 1.0 mm

We positioned the fabric so the zigzag traveled along the raw edge of the appliqué, catching the letter while allowing the outside swing of the stitch to fall just beyond its edge.
This creates that classic machine-appliqué finish while helping secure the raw fabric edge.
Test Before You Stitch
Your ideal zigzag settings can change depending on the fabric, thread, and look you’re going for.
Before stitching your actual letters, make a small appliqué sample from your leftover scraps and test your stitch settings there first.
You may decide you want a tighter zigzag, a more open stitch, or even contrasting thread that makes the stitching part of the design.
Take Your Time Around Curves & Corners
Here’s where the computerized controls of the NC-59QD become especially helpful.
When you reach a corner or need to reposition around a curve, stop with the needle lowered into the fabric, lift your presser foot, and gently pivot the project before continuing.
For tighter areas, make several small pivots rather than trying to turn the fabric dramatically all at once. This will help your zigzag follow the shape of the letter more smoothly.
And don’t forget those inside edges!
You can also use the NC-59QD’s speed control to slow things down while working around detailed areas. There’s no prize for finishing your appliqué quickly—precision is the goal here!

No Embroidery Machine? No Problem!
That’s it, you just created your own custom fabric lettering using a regular sewing machine!
Once you understand the basic technique, you’re not limited to the alphabet or today’s pillow.
You can appliqué names onto quilts, initials onto bags, words onto sweatshirts, sayings onto pillows, and so much more.
Save your free NECCHI alphabet somewhere handy because we have a feeling this won’t be the last time you use it.
Now that our personalized pocket is ready, let’s turn it into a cozy Storytime Pillow!
Sew the Storytime Book Pocket Pillow
Finished Size: Approximately 17” x 17”
We’re using an 18” x 18” pillow form for a full, snug fit.
That slightly fuller fit works especially well for this project because it gives the pillow enough structure to help support a book inside the front pocket.
What You’ll Need
Materials
- ½ yard main pillow fabric
- ½ yard or 1 fat quarter for the Book Pocket
- ¼ yard coordinating fabric for the optional carrying handle
- 2½” x 18” strip for the optional Book Pocket Binding
- 18” x 18” pillow form
- Coordinating thread
Tools
- NECCHI NC-59QD Sewing Machine
- All-purpose presser foot
- Iron and ironing board
- Sewing clips or pins
- Fabric scissors or rotary cutter
- Clear quilting ruler
- And, of course, your completed appliqué pocket if you’re adding personalization!
Cutting Guide
Cut the following pieces:
- Pillow Front: 1 — 17½” x 17½” square
- Envelope Back: 2 — 17½” x 12” rectangles
- Book Pocket: 2 — 17½” x 11” rectangles
- Book Pocket Binding (Optional): 1 — 2½” x 18” strip
- Carrying Handle (Optional): 1 — 5” x 10” rectangle
Prep Your Envelope Pillow Back
One of the reasons this project is so beginner-friendly is that we’re making an envelope pillow cover.
There’s no zipper to install and no opening to hand stitch closed. The two back panels simply overlap to create an opening where you’ll insert your pillow form.

Take your two Envelope Back pieces.
Along one long edge of each piece, fold the raw edge toward the wrong side by ½” and press.
Fold it over another ½” and press again, completely enclosing the raw edge.

Topstitch close to the inner folded edge to secure the hem.
Repeat with the second Envelope Back piece.

✂️ Using Directional Fabric?
Pay close attention to which edges you hem!
The finished edges of the two Envelope Back pieces will eventually overlap in the center of the pillow.
If your fabric has a definite top and bottom, you’ll need to hem opposite ends of the two pieces so both prints are facing the correct direction once they’re assembled.
Lay everything out before pressing if you’re unsure. A 30-second check here can save you from an upside-down pillow back later!
Prepare the Book Pocket

Place your two Book Pocket pieces wrong sides together, making sure your appliquéd piece is facing outward.

If you’re adding the optional binding, take your 2½” x 18” Book Pocket Binding strip and fold it in half lengthwise, wrong sides together. Press.
Position the binding along the top raw edge of the layered Book Pocket pieces and sew it in place, creating a clean finished edge across the pocket opening.

Want to Skip the Binding?
Absolutely!
This is one of those places where you can simplify the project.
Instead, place the two Book Pocket pieces right sides together, sew across the top edge, turn them right sides out, press the seam, and topstitch along the finished edge.
Make the Optional Carrying Handle
A handle makes this pillow especially fun for kids because they can easily carry their pillow and favorite book from room to room, to a sleepover, or on a road trip.

Take your 5” x 10” Handle piece.
Fold both long raw edges inward toward the center and press.
Then fold the entire strip in half lengthwise again, enclosing those raw edges inside.
Press.

Topstitch along both long edges using coordinating or contrasting thread.
Your handle is ready!

Assemble the Pillow Front

Place your 17½” x 17½” Pillow Front right side up.
Position your finished Book Pocket on top, also right side up, aligning its bottom and side raw edges with the Pillow Front.
Baste around the sides and bottom of the pocket to temporarily hold it in position.
Leave the finished top edge open, that’s where our book goes!
Add the Handle
Fold the Pillow Front in half to locate the center of its top edge and lightly mark the center.

Position the two raw ends of your Handle approximately 1” to either side of that center mark, with the loop of the handle extending downward toward the center of the pillow.
Baste both ends securely in place along the raw top edge.
Your entire Pillow Front Unit is now complete.
Create the Envelope Back
Place your completed Pillow Front Unit right side up on your workspace.

Take your first Envelope Back piece and position it right side down over the Pillow Front, aligning its raw outer edges with the corresponding edges of the Pillow Front.
The finished hem should extend toward the center.
Now position the second Envelope Back piece right side down from the opposite side.

Again, align its raw outer edges with the Pillow Front.
The two finished hems should overlap across the center, creating the envelope opening.
Pin or clip around the entire perimeter.
Important: Don’t Leave a Turning Opening!
Unlike many of the projects we’ve made in this series, you do not need to leave an opening in your seam.

Sew around all four sides of the pillow using your seam allowance, backstitching at the beginning and end.
The envelope opening on the back is already our turning opening!
Turn It Out!
Clip all four corners to reduce bulk, being careful not to cut through your stitches.

Reach through the envelope opening and turn the entire pillow cover right side out.

Use a point turner or other blunt object to gently push out each corner.
Straighten your Book Pocket, pull out the handle, and smooth everything into place.
And…
Your Storytime Book Pocket Pillow is Finished! 📚✨
Insert your 18” x 18” pillow form through the envelope opening, tuck a favorite book into the front pocket, and find somewhere cozy to curl up.
That’s it!

No zipper. No complicated pillow closure. And no embroidery machine required to create a completely personalized result.
One Simple Pillow, So Many Possibilities
That’s what makes this project so much fun.

Make one with a child’s name appliquéd across the pocket. Turn scraps from a favorite quilt into matching letters. Add a funny saying. Quilt the pocket before assembly. Skip the lettering and showcase a favorite print. Or use the free alphabet to customize an entirely different project.
Once you know how to sew an envelope pillow cover and create your own fabric appliqué letters, you’ve learned two techniques you can use far beyond this one tutorial.
And while this project may look simple, we still asked our sewing machine to move between everyday construction, long basting stitches, topstitching, and detailed zigzag appliqué work.

That’s where the NECCHI NC-59QD really gets to shine.
Featured Machine: NECCHI NC-59QD
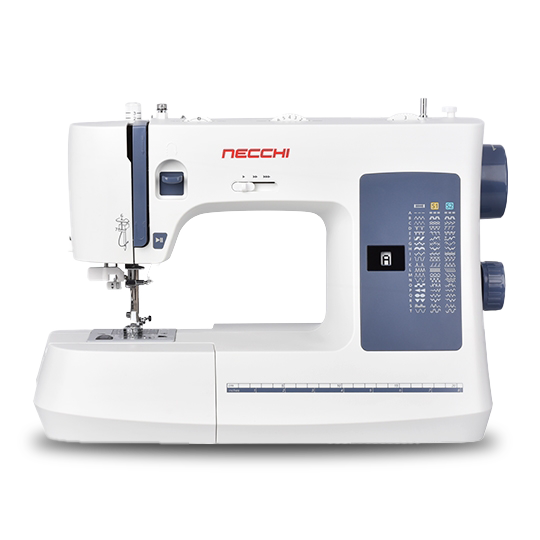
Featured Machine
Customize More with the NECCHI NC-59QD
The NECCHI NC-59QD A simple project doesn’t have to mean a simple finished result. For our Storytime Book Pocket Pillow, we used the NECCHI NC-59QD computerized sewing machine to take us from basic pillow construction to custom fabric lettering—all on the same machine.
That’s one of our favorite things about this project. You don’t need an embroidery machine to add personalized names, words, or sayings to your sewing. With the right stitch settings and a little creativity, your everyday sewing machine can do so much more than sew a straight seam.
- ✓ Included zipper foot
- ✓ Adjustable needle position
- ✓ Adjustable stitch width & length
- ✓ Variable speed control
- ✓ Built-in needle threader
- ✓ Up to 1,000 stitches per minute
Features We Put to Work
Adjustable Zigzag Stitch
For our DREAM appliqué, we adjusted the width and length of the zigzag stitch to create a classic appliqué finish around each fabric letter. Being able to fine-tune your stitch lets you change the look depending on your fabric, letter size, and personal style.
Needle Up/Down Control
Curves, corners, and small details are much easier when you can stop with the needle down in your fabric. Simply lift the presser foot, pivot your project, and keep stitching without losing your place.
Adjustable Speed Control
There’s no need to race around those appliqué letters! Slow the NC-59QD down for detailed stitching and tighter curves, then increase the speed again when you’re ready for those easy straight seams.
Computerized Stitch Selection
Move from construction stitches to zigzag and other stitch options using the NC-59QD’s easy controls—giving you more ways to experiment with the finish of future projects.
Up to 1,000 Stitches Per Minute
When it’s time to tackle the straightforward construction portions of a project, the NC-59QD has plenty of speed to keep things moving.
More Than the Basics
Project #6 is a perfect example of what you can create when you start exploring what your sewing machine can do beyond basic seams.
We used the NC-59QD to construct an easy envelope pillow cover, baste our pocket and handle into position, topstitch our project pieces, and then slow things down for detailed machine appliqué lettering.
And that free appliqué alphabet you downloaded?
Don’t save it just for this pillow!
Use your NC-59QD to add fabric letters to quilts, sweatshirts, tote bags, blankets, zipper pouches, home décor, gifts, and future sewing projects. Change the fabrics, experiment with contrasting threads, or explore different stitches to create a completely different look.
No embroidery machine required—just your sewing machine and a little imagination.

Keep Creating with Sew in Style
One pillow pattern can teach you a lot.
You now know how to sew an envelope pillow cover with a book pocket, create DIY fabric appliqué letters with a sewing machine, and turn a simple project into something completely personal.

So what will yours say?
DREAM. READ. IMAGINE. EXPLORE. A child’s name, favorite phrase, or something completely different—the next part is up to you.
Grab a book, tuck it into that new pocket, and enjoy what you made.
Share


